Set up Calstead — no terminal required
Put your booking page online without touching a terminal or writing a line of code. Every step happens in your web browser. Budget about an hour — some of it is waiting, and you can stop and come back anytime (this page remembers your progress on this device).
Comfortable with a terminal? The developer path is faster.
What you'll need
- A GitHub account (free) — where your copy of Calstead lives
- A Neon account (free) — the database that stores your bookings
- A Resend account (free) — sends your booking confirmation emails
- A Vercel account (free — choose the “Hobby” plan) — puts your page on the internet
- Your existing calendar (Proton, Google, iCloud, Outlook, or Fastmail)
- Access to your domain's DNS settings — or the person who manages your website (you'll add a few records in step 4)
Total running cost on these free tiers: $0/month. You create each account when its step comes up — no need to do it all upfront.
1. Accept your invitation · 2 min
After your purchase (or free claim), we invited your GitHub account to the Calstead repository — GitHub's word for a project folder. Open github.com/notifications (or the invite email) and click Accept invitation. Invitations expire after 7 days — if yours did, request a fresh one here.
Don't have a GitHub account yet? Create one first at github.com/signup — then tell us the username on your purchase page so we can invite the right account.
You'll know it worked when: you can open the Calstead repository page on GitHub and see its files.
2. Make your own copy · 2 min
On the Calstead repository page, click Fork (top right). A fork is a copy that belongs to you — you deploy from it, and it can still receive our updates later with one click.
On the “Create a new fork” screen, keep everything as it is (owner: your personal account) and click Create fork. Your copy stays private — nobody else can see it.

You'll know it worked when: you land on a page titled your-username/calstead (or calstead-free) with a “forked from” note under the title.
3. Create your database · 5 min
Your bookings need somewhere to live. Neon provides a free Postgres database — you never have to look inside it.
- Sign up at neon.tech (the free plan is plenty).
- Create a project — any name works (“calstead” is fine). Pick the region closest to you.
- On the project dashboard, find Connect and copy the connection string — a long line starting with
postgresql://.
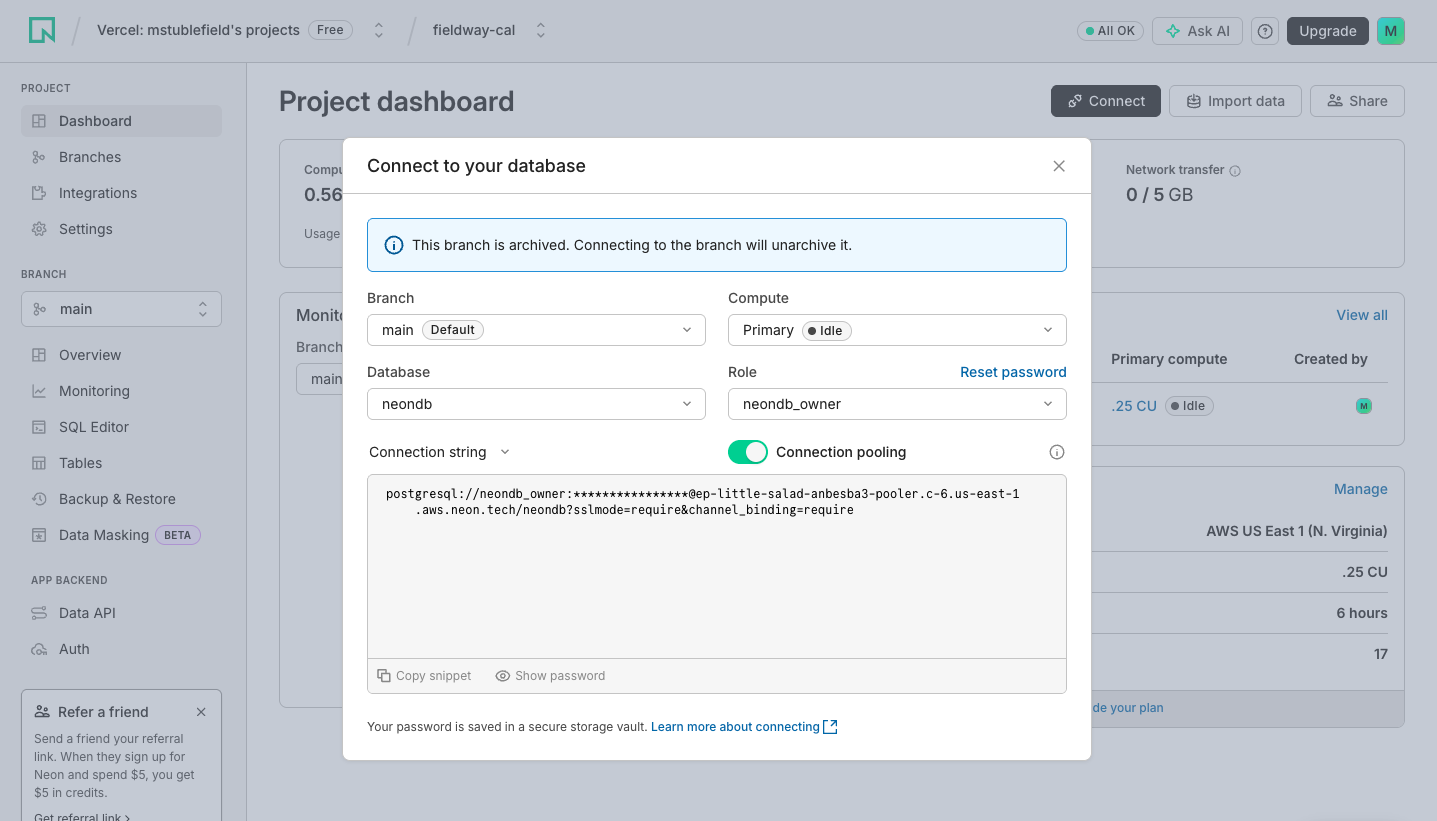
That line is a password — keep it somewhere safe. You'll paste it into the builder in step 6.
You'll know it worked when: you have a postgresql://… line saved somewhere you can find it again.
4. Set up email sending · 15 min + some waiting
Calstead emails booking confirmations from your own address. This is the only genuinely fiddly step: budget 15 minutes, and know that waiting a few hours for verification is normal — not a sign you broke something. We've put it early so the waiting happens while you do steps 5–7.
- Sign up at resend.com (free plan).
- Go to API Keys → Create API key. Copy the key — it starts with
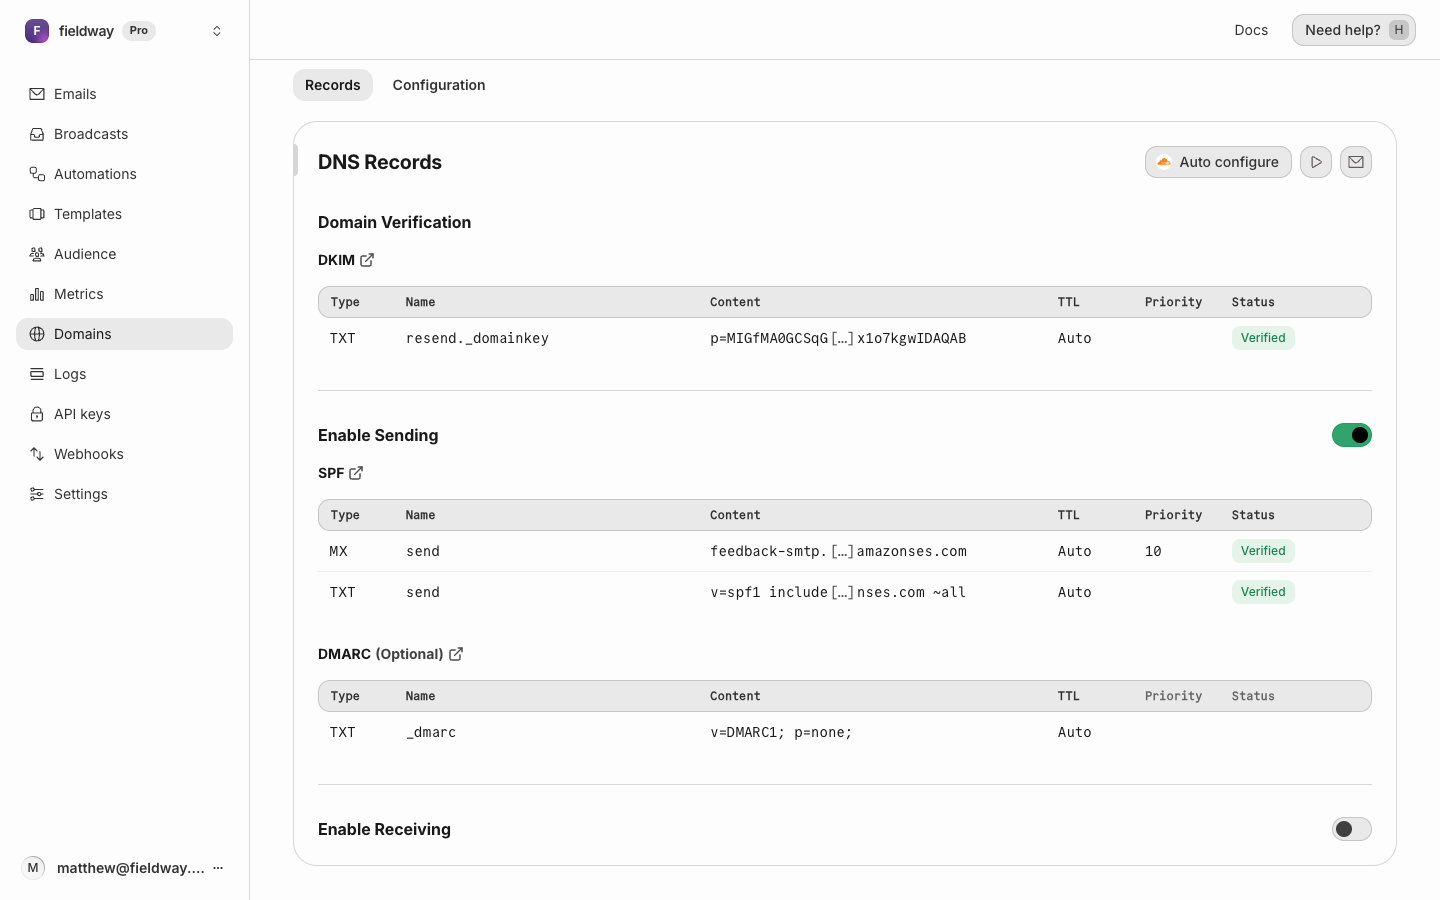
re_and is only shown once. Save it with your database line. - Go to Domains → Add domain and enter the domain your organization owns (e.g.
your-org.org). Resend shows you a short list of DNS records — think of DNS as your domain's public address book; these records tell the internet Resend may send mail for you. - Add those records wherever your domain is managed (see below), then click Verify back in Resend.
Where to add the DNS records:
Cloudflare
Log in → pick your domain → DNS → Records → Add record. Copy each record's type (TXT or MX), name, and value from Resend exactly. For TXT records, set the proxy status to “DNS only” (grey cloud).
Namecheap
Dashboard → Manage next to your domain → Advanced DNS → Add new record. Namecheap wants the name without your domain on the end — if Resend says send.your-org.org, enter just send.
GoDaddy
My Products → your domain → DNS → Add. Like Namecheap, enter the name part without your domain on the end.
Squarespace
Settings → Domains → your domain → DNS settings → Add record.
Wix
Domains page → ⋯ next to your domain → Manage DNS records → add each record.
Somewhere else / I don't know
Whoever built or hosts your website likely manages your DNS — forward them Resend's record list and this sentence: “Please add these DNS records so we can send email via Resend.” It's a five-minute job for them. To find out who manages your domain, search your inbox for “domain renewal”.
Verification usually completes in minutes but can take a few hours. Keep going with step 5 while it settles — you don't need to wait here.
You'll know it worked when: the domain shows Verified in Resend (check back later if it's still pending), and you have your re_ key saved.
5. Get your calendar's secret address · 5 min
Calstead reads your busy times through a secret calendar address (an “ICS feed”) your calendar app publishes. Find yours below — then treat that address like a password, because anyone who has it can read your calendar.
Proton Calendar
Settings → Calendars → your calendar → Share → Share with anyone → copy the public link.
Google Calendar
At calendar.google.com: gear icon → Settings → click your calendar in the left list → scroll to Secret address in iCal format and copy it. Use the secret address, not the public one — the public one hides details and may show nothing at all.
iCloud Calendar
At icloud.com/calendar: click the share icon next to your calendar → Public Calendar → copy the URL. It starts with webcal:// — paste it as-is; the builder fixes it automatically.
Outlook / Microsoft 365
Outlook on the web: gear icon → Calendar → Shared calendars → Publish a calendar→ choose your calendar and “Can view all details” → Publish → copy the ICS link.
Fastmail
Settings → Calendars → edit your calendar → Sharing → Get a link → copy the ICS subscription URL.
You'll know it worked when: you have a long address ending in .ics (or similar) saved with your other values. Three saved values so far: database line, Resend key, calendar address.
6. Build your settings block · 10 min
Now bring it together. Fill in the builder below — it assembles the settings block you'll paste into Vercel in the next step, including a secret setup token generated right here in your browser.
Private by design: everything in this builder happens inside your browser. Nothing you type here is ever sent to us — this website cannot see your database password, API key, or calendar address. (View the page source if you'd like to check.)
+Optional extras
Your secret setup token
Generated here in your browser. It protects your setup page — it goes into the settings block automatically.
generating…Still needed:
- Your name
- Your email address
- Site name
- Web address
- Timezone
- Database connection string (step 3)
- Resend API key (step 4)
- Sending address (step 4)
- Calendar address (step 5)
- Setup token (still generating — one moment)
You'll know it worked when: you've copied the settings block and the finish-line link somewhere safe.
7. Put it online · 10 min
- Sign up at vercel.com/signup — choose Hobby (free) and Continue with GitHub so it can see your fork.
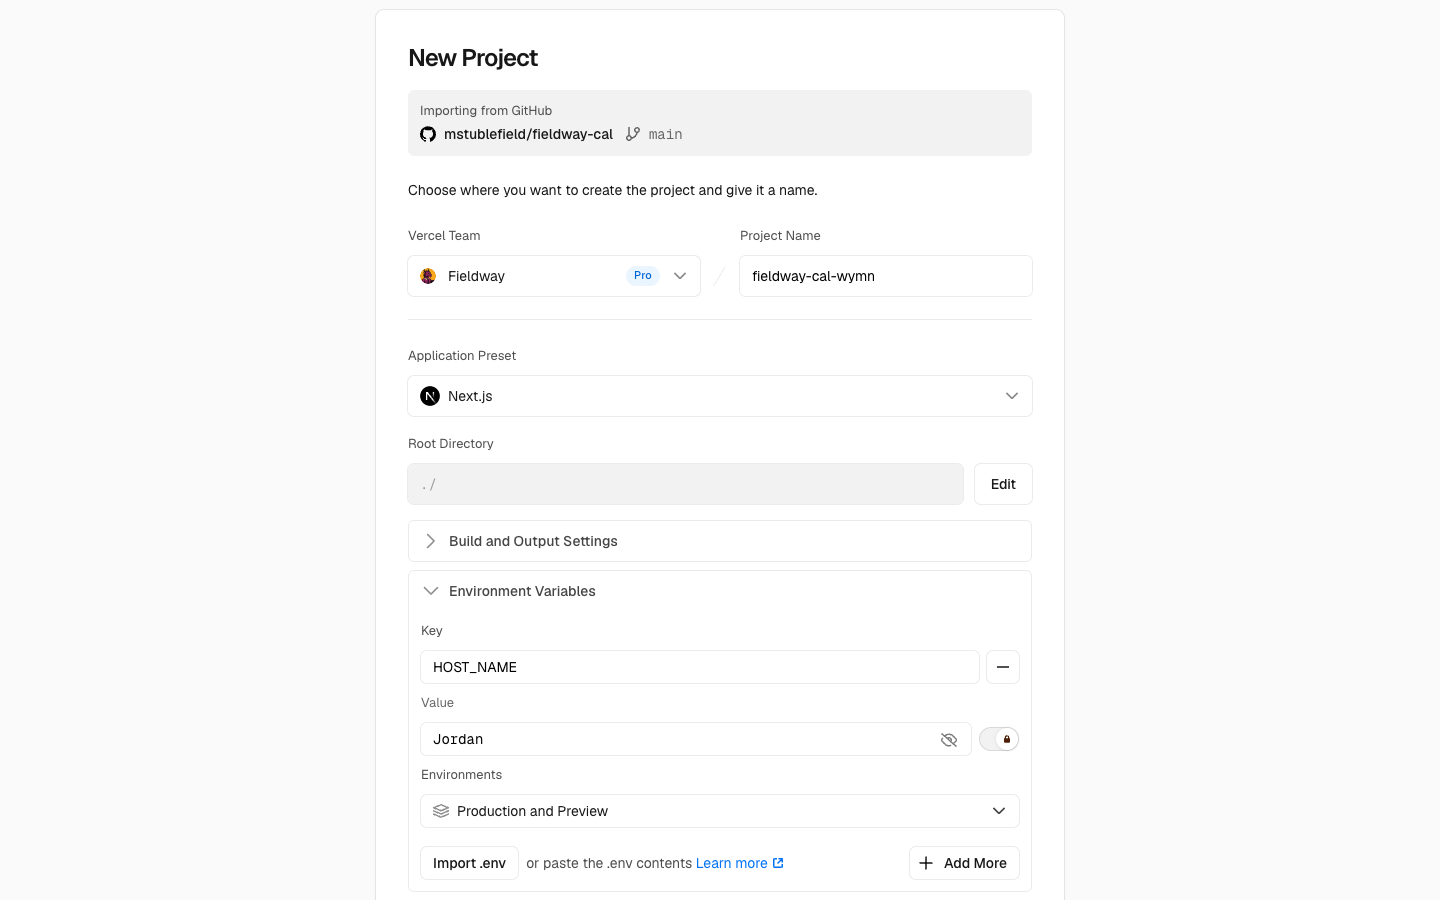
- Go to vercel.com/new and click Import next to
calstead. - Project name: if you don't have your own domain, this becomes your free web address (
your-name.vercel.app) — make it match what you entered in the builder. - Open the Environment Variables section. Here's the trick: click into the first Key field and paste your entire settings block. Vercel fills in every row automatically.
- Click Deploy and give it about two minutes. Scrolling text is normal — that's your site being built.
+Using your own domain instead of the free address
After deploying: project → Settings → Domains → add something like booking.your-org.org and follow Vercel's DNS instructions (same address book you edited in step 4). Then update NEXT_PUBLIC_BASE_URL under Settings → Environment Variables to the new address and redeploy. Your finish-line link changes to the new domain too.
You'll know it worked when: Vercel shows “Congratulations” with a preview of your page.
8. Finish on your own site · 5 min
Open your finish-line link from step 6 — it looks like https://your-address/setup?token=…. That's your deployment's own setup page, and only you have the token.
- Click Create database tables — one click, a few seconds.
- Click Send a test email and check your inbox.
- Every check on the page should now be green. If one isn't, its row says exactly what to fix.
Then the real test: open your booking page and book a meeting with yourself. You should get two emails — the guest confirmation and your host notification — with a calendar invite attached.
You'll know it worked when: your test booking shows up in your calendar, and the setup page is all green. That's it — you're live. Bookmark the finish-line link; it's your health dashboard.
Keeping it up to date
When we ship improvements, open your copy on GitHub and click Sync fork → Update branch. Vercel notices and redeploys automatically — that's the whole update process. If our release notes mention a database change, also open your finish-line link and click Re-run database setup (always safe).
Want different meeting types, lengths, or working hours? Your copy's README and docs/ folder cover customizing event types — editable right on github.com, and Vercel redeploys on every change you save.
Troubleshooting
Resend still says 'Not verified'
DNS changes can take a few hours to spread. Double-check each record matches Resend exactly (a common miss: your DNS host may want the record name without your domain on the end). Still stuck after 24 hours? Delete the records and re-add them carefully, or ask whoever manages your website.
My build failed on Vercel
Open the failed deployment and skim the log's last lines. The usual cause is a missing or mistyped setting — compare your project's Settings → Environment Variables against your saved settings block, fix, and hit Redeploy. If it mentions something else entirely, send us the log.
The setup page says my database isn't reachable
Free Neon databases nap when idle — click the button again after a few seconds. If it keeps failing, re-copy the connection string from Neon and update DATABASE_URL in Vercel (Settings → Environment Variables), then Redeploy.
My calendar shows no busy times
Make sure you copied the secret address (Google calls it “Secret address in iCal format”), not the public one. New public links can also take a few minutes to start serving events. The setup page's calendar row shows how many events it found.
I don't have a domain at all
You can run everything on the free your-name.vercel.app address. The one limit: Resend needs some domain you own to send email from. Domains cost ~$10/year at Cloudflare or Namecheap — buy one, and you get a professional booking address out of it too.
I lost my settings block or setup token
Your settings live safely in Vercel under Settings → Environment Variables — including SETUP_TOKEN, which rebuilds your finish-line link: https://your-address/setup?token=YOUR-TOKEN. The builder on this page can also regenerate a block anytime.
I want to change a setting later
Vercel → your project → Settings → Environment Variables → edit the value → then Deployments → ⋯ on the newest → Redeploy. The redeploy matters: settings whose names start with NEXT_PUBLIC_ are baked in when the site builds.
Still stuck? Email hello@calstead.com or drop into the support channels — a real person answers.
Prefer the terminal after all?
The 15-minute developer path